Tutorial
How to Install and Use Tailwind CSS with Django 3.2 (2021)
Configure Django 3.2 to use Tailwind CSS with a Node-based build step, including tailwind.config.js, static files, and production purge.

Django is a great Python framework for building robust web applications. But you need the UI to look much better when you use this framework—that's why we use Tailwind CSS, because it gives you the ability to create your own utilities. So without further ado, let's configure Django to use Tailwind CSS.
Create the project and app#
I'll start by creating a brand new project so it's clear for everyone. First, create a new folder called "myProject" with:
mkdir myProject && cd myProjectNow we're inside "myProject". Create the Django project (the core folder will contain all global settings and routing):
django-admin startproject core .Create an app called blog:
python manage.py startapp blogAdd the app name in the core folder: in settings.py add the app to INSTALLED_APPS:

Create a folder named "templates" for all your HTML pages. You can put it anywhere in the project; I'll put it in the blog app:
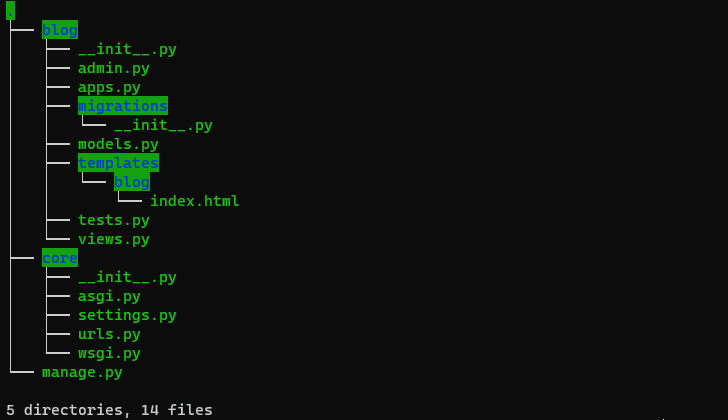
Create a folder called static in the blog folder, and inside it a folder called css:
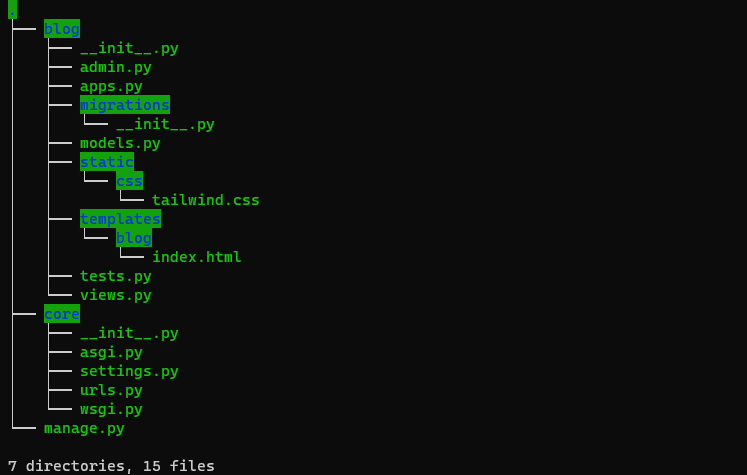
Install Tailwind and set up the build#
Create a folder called jstools for all JS-related tooling:
mkdir jstools && cd jstoolsWe're in myProject/jstools/. Run the Node commands to install Tailwind and related dependencies (make sure Node is installed):
npm init -y && npm install tailwindcss autoprefixer clean-css-cli && npx tailwindcss init -pThe directory will look like this:
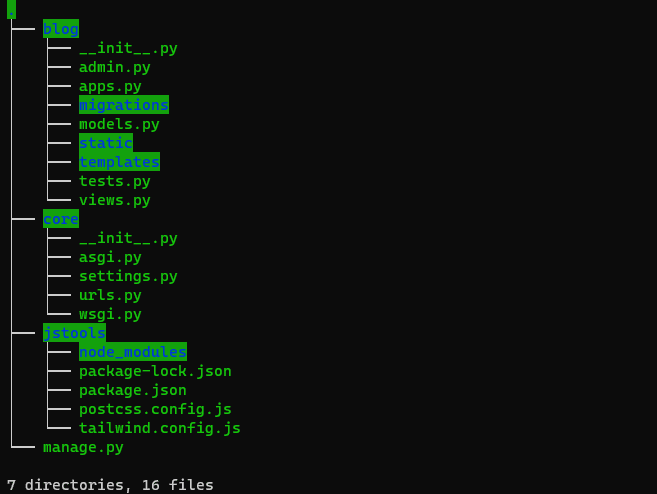
With these dependencies installed, add a build script in your package.json:
...
"scripts": {
  "build": "tailwind build ../blog/static/css/tailwind.css -o ../blog/static/css/style.css && cleancss -o ../blog/static/css/style.min.css ../blog/static/css/style.css"
},
...
If your static folder is in a different directory, adjust the paths accordingly.
Configure Tailwind#
Configure tailwind.config.js:
module.exports = {
  future: {
    removeDeprecatedGapUtilities: true,
    purgeLayersByDefault: true,
  },
  purge: {
    enabled: false, // true for production build
    content: [
      '../**/templates/*.html',
      '../**/templates/**/*.html'
    ]
  },
  theme: {
    extend: {},
  },
  variants: {},
  plugins: [],
}
Create a Tailwind entry point at blog/static/css/tailwind.css:
@tailwind base;
@tailwind components;
@tailwind utilities;
Build and link the CSS#
Now build:
npm run buildThis generates two output files: style.css and style.min.css.
Link style.min.css in your HTML. In this example we'll link it in index.html. At the top of the template add:
{% load static %}Then link the CSS:
<link rel="stylesheet" href="{% static 'css/style.min.css' %}" />When developing, keep purge disabled so you can use all of Tailwind's features.
Production#
When you're ready for production, set purge to true in tailwind.config.js.

Related posts
How to Correctly Deploy a Django 3.2 App on Heroku and Avoid 500 Server Error
Step-by-step guide to deploying a Django 3.2 app on Heroku with gunicorn and WhiteNoise, including static files, Procfile, and avoiding common 500 errors.
May 26, 2021 · 4 min read
How to Set Min and Max Range for Radial Bar (Gauge) in ApexCharts
A workaround to customize min and max values for ApexCharts radial bar (gauge) charts, including formulas for percentage conversion and data label formatting.
Sep 7, 2021 · 3 min read
Domain Is Already Owned by Another Vercel Account – Solution
How to resolve the 'domain is already owned by another Vercel account' error when adding a custom domain, including the Hashnode subdomain case.
Sep 6, 2021 · 2 min read